Sunday, December 16, 2018

Roasted Carrot Soup with Curry and Coconut Milk


Recipe inspiration...I didn't plate mine with the coconut milk swirl and cilantro
On Friday I decided to make some soup from the Yum & Yummer cookbook.  It was pretty simple really - roast your veggies in the oven for about 45 minutes, then toss them in a pot with some spices and broth, then puree the soup either by blender or immersion blender (I don't have an immersion blender so I did it the more difficult way but it was SUPER smooth). I would say you can do this start to finish in about an hour.
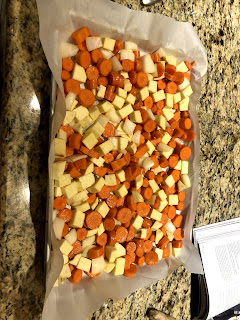
Chopped veggies ready for the oven
I peeled and chopped up my carrots and sweet potato, and onion - I didn't have a clove of garlic as I don't use them - I buy the pre minced stuff in the jars, so I just skipped the garlic so it wouldn't end up being super garlicky (since a roasted clove tastes much weaker than diced up garlic).

I had to use a giant cookie sheet as it wouldn't fit on a standard one (according to the video I may have chopped my veggies a bit smaller than necessary).


the ingredients I used minus the veggies shown previously
Once the veggies were roasted, I tossed them into a big soup pot - and added the broth (I underestimated how much vegetable broth I needed and only bought one vegetable broth)...so I added two cups of beef broth which I don't think made much difference other than to a vegetarian...


Waiting for the broth to boil
I added all of the spices and brought to a boil...then took it off the heat and added the coconut milk. I had to whisk the coconut milk as it was pretty chunky...so just beware if you don't use coconut milk very often - I think if I had warmed it up a touch it would have been easier to mix back together, but whatever - it ended up just fine.


Blending about 1/3 of the soup at a time in the blender
Then came the tricky part...moving boiling hot soup into the blender.  My blender has a soup function so I just used that, but I assume any blender would work - just beware that it needs to vent while blending as its very hot...so don't put too much in the blender at once and be careful while blending to ensure it doesn't result in the lid popping off from the pressure of the steam.  


Soup transferred into a casserole dish
I moved the blended portions into a casserole dish until the last bit of chunky mixture went into the blender and I could mix it altogether again in the pot.

mmmm...fresh buns
I had made fresh buns to eat with it, which was nice, but I would have liked more texture and variety to the soup, as it is quite thick and I like to add crackers or eat a grilled cheese sandwich or something with this type of soup, but maybe a more refined person could add some croutons for some crunch or even some nice tandoori marinaded chicken would have been good to add just before serving.

Finished soup, super smooth and thick and creamy
It said it made about 8 cups...but I would say it made double that...so maybe I had way more vegetables than I should have, but based on the recipe, I used 2 lbs of carrots and a medium sweet potato and small/medium onion as the recipe called for...sooooo I'm not sure.

Link to the video for reference


Friday, December 14, 2018

Carrot Cake Sandwich Cookies

I decided to go rogue and am baking a recipe from Mindy’s repertoire instead of using the Yum & Yummer book. She gave me a few tips for baking these cookies and I should have listened closer.

All my ingredients ready to go.


I grated the carrots very finely and set them aside


I blended the butter sugar egg and vanilla and set it aside.


I don’t have a sifter so I just beat the dry mixture with a fork. I had raisins in my cupboard so I used them instead of currants. Then I added the wet mixture to the dry mixture mixing very very well.

All mixed up


12 minutes in the oven and they were ready. I used a small scoop to try and make them the same size but I obviously screwed it up. I thought I was making them small enough but they turned into GIANTS! There’s no possible way to make my mini cakes into sandwiches that will fit into my mouth so I decided to ice one side of each cookie. My icing was runny so I’m not sure how you would pipe it nicely. Maybe if I were to refrigerate the icing first it might be better for piping.

These cookies taste like little cakes not really a cookie. Nice and moist with wonderful texture from the coconut and oatmeal. The raisins were a great choice adding sweetness as these are not overly sweet. I will definitely have to make these again I will make the wet dough flatter before going into the oven next time.

Friday, December 7, 2018

Asian Chicken Lettuce Wraps with Hidden Veggies

I got my ingredients from Superstore but I could not find a Boston lettuce.

 I would suggest that you buy a small amount of zucchini and cucumber because you don’t use very much of either of them if you don’t really like them for something else you’re going to have leftovers. First thing I did was to chop up all my veggies very very small.


 She calls for ground chicken for this recipe but I choose to use ground beef because that’s what I had in my fridge. In hindsight I should have used ground chicken because the ground beef was quite strong tasting and kind of over took the lovely sauce flavor. 


 I whipped up the sauce and set it aside. 

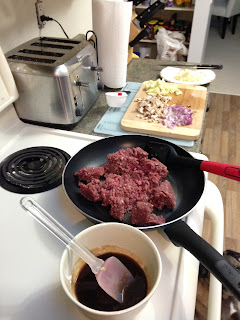
 I started to cook the meat 


 Now  the meat is all cooked and ready for me to add the vegetables that are chopped very finely.

 I added zucchini the onions and the mushrooms to sauté then I added the water chestnuts and the sauce to the meat mixture and set it aside. 

I broke the Romain into leaves and chopped up some green onion and Julinne  cucumbers as garnish I forgot to put the sesame seeds on until the very end but they sure added a nice texture to the meat mixture.
 This was super easy to make and very tasty I don’t think that I would make it with Romain lettuce again because the lettuce was hard it and  didn’t hold like a taco very well. The taste was great and I think I’ll make this again one day. 


Thursday, December 6, 2018

Staff Potluck Means a Tasty Treat!

 So I had a staff potluck coming, and I was wanting to cook something delicious. I really had hoped to do something from Yum and Yummer, but kind of was feeling lazy as its hard to prep when you teach so that things are ready for lunch. Plus you have to drag all the stuff with you that you will need. I figured I would make a dessert as I saw people were doing more salty/savoury food....and let's be serious, I like sweets and treats!

I have made this recipe in the past for Christmas dinners, and its sort of perfect for this time of year, White Chocolate Peppermint Cheesecake cups. I came across the recipe on my many hours of pinning on Pinterest and dreaming of all the delicious foods I could make. I put the actual recipe and the link to the website that has this recipe.

As usual I modify and use my own eyeball measurements. I am sort of brilliant, so I bought desserts in cups from Costco awhile ago and was clever enough to see if I cleaned them and saved them I could reuse. They are glass, which is sort of wonderful and because they have a plastic container they sit in, it makes it super easy to take them for potlucks, etc. Yes, it is okay to mutter to yourself, "she is a freaking genius"!
I cheated and just used a chocolate cookie crumb, and even went for the cheap brand!
So my first modification was to not use the "Nabisco Famous Chocolate Wafers". I find they can be pricey, and there really are not that many in the boxes you get. I also have found them hard to find or sold out at a lot of stores. So I just grabbed a bag of chocolate cooking crumbs, and totally cheaped out and bought the no-name brand. Did I mention I am cheap? You can splurge and buy fancy, but I found these were great and you saved a whole dollar!

One of my favourites
Yummy butter! A little extra never hurt anyone...

So the base asks for the cookies (that you turn into crumbs so it seems sort of daft that you don't just start there), butter, and After Eight chocolates.  I may have put in a few extra After Eights (I totally did), and extra butter! I just scooped generous Tablespoons. Anyhow I ended up adding more crumbs which gave me more cookie base, which I liked as I added some on top at the end. I hate when you eat all the stuff on top with no base as its tricky scooping out that base in a deeper jar.


I added some peppermint candy cane bits over the cookie butter base

The cookie base


So I scooped in the base and decided I would use some peppermint crunch stuff I have on top of the base for a little contrast and flavour. Next was the chocolate mint cheesecake filling. I can never find the exact stuff they ask for with puddings. I find most stores do not fully stock various flavours that are available in the US, or other places. I did find a sugar-free white chocolate instant pudding. Frankly, I would have preferred with sugar as I always find you can taste a hint of the sugar sweetener.  I did not find a cheesecake flavour pudding mix so I used vanilla pudding and NOT sugar-free. My guess is if you wanted you could just use chocolate too, which I considered but you won't get the same aesthetic. (The recipe is below)

So I put it all together and filled up my cups. I then added my extra crumb on top and added some peppermint crunch and a small candy cane. These are super easy and look fantastic. Everyone enjoyed them at work. 


Cups all ready to go! I got these from trying some cups of treats at Costco and with forethought kept them to use for my own treats.


Delicious tasty treat...not the greatest photo, but you get the idea

No-Bake White Chocolate Peppermint Cheesecakes

DESCRIPTION

Note: Please be sure to use real peppermint extract in this recipe for the best results. Be careful NOT to buy mint extract which is usually a combination of peppermint and spearmint. The spearmint flavoring will be too strong for this dessert.

INGREDIENTS

For the crust

  • ½ package Nabisco Famous Chocolate Wafers (about 20 cookies)
  • 10 After Eight chocolate mints
  • 2 tablespoons melted butter

For the filling

  • 1 1-ounce package sugar-free white chocolate instant pudding mix (or a 3-ounce package of the regular pudding mix)
  • 2 cups whole milk
  • 1 8-ounce package cream cheese, softened to room temperature
  • 1 1-ounce package sugar-free cheesecake-flavored instant pudding mix (or a 3-ounce package of the regular pudding mix)
  • ½ teaspoon real peppermint extract (do not use mint extract which is typically a combination of peppermint and spearmint)
  • 1 12-ounce container frozen whipped topping, plus extra for garnish, if desired
  • 1-2 drops of red food coloring (optional)
  • Candy cane sticks, After Eight chocolate mints, and additional crushed chocolate wafers and crushed candy canes for garnish, if desired

INSTRUCTIONS

  1. Place the chocolate wafers and chocolate mints in the bowl of a food processor and pulse into fine crumbs. Add the melted butter and pulse again until combined.
  2. Spoon the crumbs into individual 9-ounce plastic cups (or other individual sized cups for serving). Place in the refrigerator to set while you are preparing the filling.
  3. Prepare the white chocolate pudding with the milk according to package instructions. (Note: Do NOT prepare the cheesecake pudding mix – that will be added as a dry stabilizer later in the recipe.)
  4. In the bowl of a stand mixer with the paddle attachment, beat the cream cheese until light and creamy.
  5. Add the prepared white chocolate pudding, the dry cheesecake pudding mix and the peppermint extract and beat until completely mixed, scraping down the sides and bottom of the bowl to ensure that all ingredients are well combined.
  6. Change your stand mixture attachment to the wire whisk. On slow speed, fold in the tub of frozen whipped topping and until well combined. If you’d like to tint your cheesecakes a light pink “peppermint” color, add 1 drop of red food coloring – you can leave the color swirled or mix completely for a light pink color. If desired, add a second drop of red food coloring if you want a darker pink color and mix again.
  7. Allow the mixture to sit in the refrigerator for about an hour to firm up.
  8. Using a large pastry bag with a large tip, or a spoon, top the chocolate mint crumb crust in each cup with the cheesecake mixture and refrigerate until ready to serve.
  9. Garnish with additional whipped topping, a candy cane stick, a chocolate mint and crushed chocolate wafers and candy canes, if desired.
  10. https://www.afamilyfeast.com/no-bake-white-chocolate-peppermint-cheesecakes/

Tuesday, December 4, 2018

Lip-Smacking Maple-Curry Chicken


Well I’ve been meaning to make this for a while now, and even went to make it this weekend but discovered I didn’t have all of the ingredients - ugh!  So tonight was the night!

I used chicken thighs as that’s what I had in my freezer and my hubby gets sick of chicken breast  all of the time since he prefers dark meat.  I also didn’t use real maple syrup (I’m sure I may have my Canadian citizenship revolked by saying this, but I don’t like the real stuff...it’s too watery!) so I buy good old Aunt Jemima!  I also don’t buy low sodium soy sauce as when I do use it, I want the saltiness.

I only marinaded for just about two hours - I honestly didn’t check the instructions beforehand so I didn’t realize I needed to let it marinade first.


This is what it looked like once it was all mixed up and ready to go into the fridge.


I decided to just put all of the marinade and chicken into the pan to cook it, but we discovered that this may have led to it being too saucy.  My hubby felt the curry and mustard was a bit overwhelming but it could be that it was caked in the sauce and not just a “drizzle” of it added before baking.  I personally felt like the flavours conflicted a bit to me...like a hybrid honey mustard and curry taste.  It definitely had lots of flavour but it wasn’t something I would put in my regular rotation for cooking.  Maybe it was the maple syrup or soy sauce or lack of marinading, or too much sauce...I guess one will only know if they venture to try it again!


Link to the video clip of the recipe being made is here 


Sunday, December 2, 2018

Chicken Enchilada Casserole with Black Beans and Butternut Squash

Me cooking

I got my ingredients from Save On Foods. She recommends you use a store cooked chicken for the recipe but Mike doesn’t like dark meat at all so I just barbecued three chicken breasts instead. 

Then I diced all the vegetables and chicken in small cubes . I have never eaten butternut squash before so I was not sure how this was going to taste.


The sauce was super easy to make I’m glad I used a larger pot as it made tons.


I layered the beans, chicken, squash, sauce, cheese and tortillas wrapped it in foil and baked it. I decided to use the regular bake function on my oven instead of the convection because my oven cooks way faster that way. This was a fantastic idea because the cook time was ecxactly correct.


All ready for the oven


Cooked


Garnished 


Ready to eat!

I was concerned that the butternut squash was going to be under cooked as you don’t pre-cook or roast it. I was mistaken!  Thankfully they were nice and soft and easy to eat they are very flavourful so they sucked up a lot of the super tasty sauce. I was not very pleased with the texture of the tortillas they got very soggy which I don’t like very much. So in future if  I were to make these again I would definitely just make it without the tortillas and bake it has a barge casserole and eat it that way. Then I would scoop the casserole with taco chips. I prefer a little more spice in my Mexican food so I would definitely put in some Frank’s hot sauce well I was making the sauce for the recipe.


From the cookbook


Link to video


Sunday, November 25, 2018

Curried Coconut Rice with Grilled Pineapple

Looking pretty fly in the kitchen if I do say so myself!


Well I wanted to do a recipe that was fairly easy and would be a good dinner item as that was what I needed to make today. I love coconut rice, so I figured I would give this one a go, Curried Coconut Rice with Grilled Pineapple.

I did not use fresh pineapple


I followed the recipe vicariously...a.k.a. I was not fully prepared to add things when I was supposed to and so I looked like a bit of a crazed maniac at first. You heat the oil (coconut or olive oil. I used olive oil as that was what I had), and add your diced onions. I had green onions already chopped very finely, so I chose those instead and they really don't require cooking, so they were a bit over sizzled by the time I added the rice, ginger, followed by groping around to find the curry. When you have a house husband he tends to think he should reorganize the kitchen-this means I can't find things! I pulled crap out, and had stuff everywhere, standing on chairs to look at the back of the cupboard and pantry, only to find it where we have honey and tea...So then you add your coconut milk and water mixture, along with salt. I totally forgot the salt until the rice was cooked.

Rice getting all cooked up

I decided to make a coconut curry as well to go with the rice, but I totally cheated and used sauce I grabbed at Costco.

cooking some chicken in coconut curry to add as a side to the rice

chicken bits getting fried

Rice cooked with pineapple and minced cilantro added at the end as per recipe

Coconut chicken curry a la glass jar sauce from Costco


Everything was fairly easy to whip together. I did put the not fresh, but canned pineapple on broil in the oven to try to get a "grilled" look, but my parchment was just burning, so I took it out before it actually got brown tips. I do know that parchment will burn, in case anyone is thinking I am a total moron...well I guess that does not take away the moron, but I am a knowing moron!

You add the pineapple and freshly minced cilantro at the end, when you "fluff" your rice, a.k.a. stir it at the end. Overall it was tasty but not very coconut flavoured. The pineapple did not over power and you could likely add more than the one cup asked for in the recipe. I actually think you could add more curry as it was very faint, so anyone who does find curry overpowering this recipe is not that way at all. My family all enjoyed it, and even said more pineapple would be good, but we eat a lot of fruit here, so I think its balanced nicely with one cup.

Here is the video link to the video making the rice
Yum and Yummer

Friday, November 23, 2018

Cauli “flour” Crusted Quiche

 I picked up my supplies from Superstore  I had basically everything I needed just had to pick up cheese and veggies. I thought that this would be a very difficult recipe to do because of making the cauliflower crust. But in actuality it was very easy to put together this very yummy quiche.


I did not cut my veggies as I went as she suggests in the recipe procedure I find it easier if I have everything chopped up  and measured before hand so that I just have to put it together. I diced the veggies very small so that they would be easy to put on the fork when I was eating. 


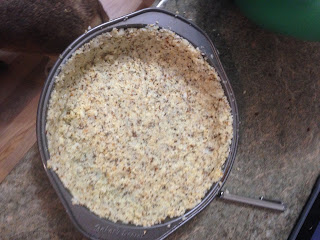
 Making the cauliflower  batter was a lot easier than I had initially thought. I did not know how my food processor was going to handle all that raw cauliflower but it whipped it up in no time at all it took maybe 30 seconds for the food processor to make the little rice sized pieces.  I would suggest that you grease your cookie sheet before putting the cauliflower bits in the oven for the first time as mine got really stuck and made a big mess when I was trying to transfer the bits from the cookie sheet into my big bowl.  Thank goodness my dog Lenny really likes cauliflower and he cleaned up the mess for me ha ha Ha. 


Raw cauliflower pie crust


Baked pie crust


Cooking in the oven


 She says to cook the quiche for 40 minutes to 45 minutes and I found that 40 minutes was a bit too long they could’ve taking out a five minutes earlier and it would have been better it was a little overdone on top. But this didn’t affect the taste at all. 


Picture perfect 


 The ratio of veggies to egg was very good. I found this to be a very flavourful quiche but nothing was overpowering. This takes a long time to make but is really worth the effort when you’re done though.

Link to video 


Mediterranean Quinoa Salad

Salad is on the top right side of plate. I did not think about pictures until I was eating... Most of you may be aware we have gone on...